How to Activate Milan's Area C Ticket Online
If you’re driving into Milan’s Area C, the city’s congestion charge and limited traffic zone (ZTL), paying for a ticket is only half the job. To avoid fines, you must also activate your ticket so it’s linked to your license plate and the exact day you enter the zone. There are several ways to do this, including SMS, phone, app or online. In this guide, we’ll explain how to activate your Area C ticket online in the official Comune di Milano portal. The portal itself is only available in Italian, so this article includes translations and screenshots to guide you through the process step by step.
Step 1: Go to the official Area C activation page.

When you arrive at the page, and before you continue, the site may open a window with a privacy notice in Italian. This notice explains that the Municipality of Milan (Comune di Milano) is responsible for handling your data, which are used only to manage Area C access and exemptions. It lists the types of information collected, such as your name, residence, vehicle license plate, driver’s license number, and tax code, and clarifies that the processing follows European data protection rules (GDPR). To proceed, simply scroll through the notice and click “Accetta e chiudi” (Accept and Close).
Step 2: Start the Activation and Enter Your Ticket Code (PIN)

Once you close the privacy policy, you’ll see the activation page itself. At the top, it contains instructions in Italian that outline the whole activation process - entering your ticket code, confirming your vehicle details, and finalizing the activation. It also provides key reminders: tickets normally must be activated by the end of the day after you drive into Area C; if you forget, you can still regularize your entry within 7 days by purchasing a special €22.50 biglietto differito (deferred ticket); and certain tickets, such as garage tickets or school NCC trips, must always be activated on the same day.
To actually begin, scroll down to the table at the bottom of the page. There you’ll find the fields where you need to:
- Click “Inserisci” (Insert)
- Enter your ticket code, called Codice PIN
- Press “Conferma” (Confirm)
This is the point where the activation process truly starts. In the next steps, you’ll connect your ticket to your license plate and confirm your vehicle details.
Step 3: Enter Your License Plate

After pressing Conferma on the ticket code page, a new window will open titled “Attivazione Ticket Veicoli AreaC.” This window is labeled “Targa” (License Plate) and this is where you enter the details of your car’s license plate.
In this window, you’ll see two fields:
- Numero di Targa - type in your license plate number.
- Nazionalità — use the dropdown menu to select the nationality of your plate (for example, IT for Italy, DE for Germany, FR for France).
At the bottom, click “Avanti” (Next) to continue. This will open the next window in the activation process.
Step 4: Confirm Vehicle Category

After entering your license plate details, the next window that opens is called “Verifica Categoria AreaC” (Verify Area C Category). This is where the system shows you the vehicle category it has detected for your car, or where you can choose the category if it wasn’t recognized automatically.
In this window, you’ll see the following fields:
- Targa - your license plate number (which you entered in the previous step).
- Categoria AreaC Rilevata - the Area C vehicle class detected by the system. In some cases, this may display “Classe non rilevata” (class not identified).
- Tipologia del Ticket AreaC - the type of ticket you need to purchase for Area C, usually shown as “Accesso a pagamento” (paid access).
- Categoria AreaC Dichiarata - a dropdown menu where you can select your declared Area C vehicle category if the system hasn’t automatically recognized it.
At the bottom, there’s also a note in Italian reminding you to consult the Comune di Milano website, specifically the Area C Today calendar of restrictions, to verify if your vehicle type is allowed to enter Area C.
If everything looks correct, or once you’ve selected the right option from the dropdown, click “Avanti” (Next) to continue. This will open the following window. If you need to go back and correct something from the previous step, you can click “Indietro” (Back).
Step 5: Confirm Access and Payment Conditions
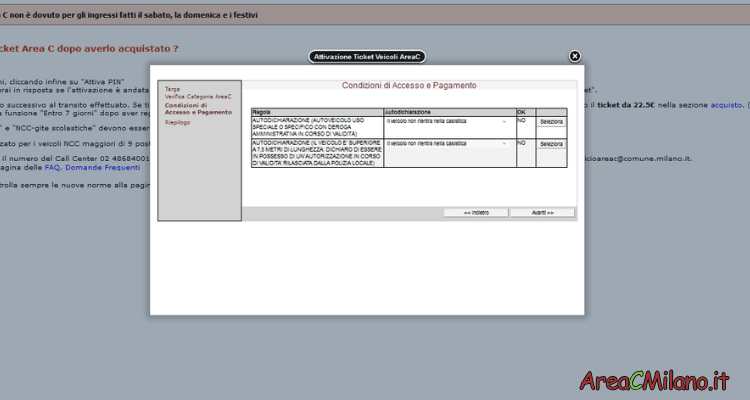
The next window is titled “Condizioni di Accesso e Pagamento” (Access and Payment Conditions).
This is a self-declaration stage where you confirm that your vehicle does not fall under special exemptions or restricted categories. You’ll see a table with the following rules:
- Autodichiarazione: Autoveicolo uso speciale o specifico con deroga amministrativa in corso di validità
(Self-declaration: Vehicle with a special or specific use and a valid administrative exemption) - Autodichiarazione: Il veicolo è superiore a 7,5 metri di lunghezza – dichiarando di essere in possesso di un’autorizzazione in corso di validità rilasciata dalla Polizia Locale
(Self-declaration: The vehicle is longer than 7.5 meters - declaring to be in possession of a valid authorization issued by the Local Police)
For each line, there is a dropdown labeled Autodichiarazione (Self-declaration). By default, it will say “Il veicolo non rientra nella casistica” (The vehicle does not fall into this category). For most private vehicles, this default setting is correct and you don’t need to change it. Next to each line you’ll also notice a button that initially says “Seleziona” (Select). Once you choose an option from the Self-declaration dropdown, the button changes to “Conferma” (Confirm). This means your selection is ready to be validated by the system.
When you’re done, click "Avanti" (Next) and the following window will open. If you need to go back and correct something, you can always click Indietro (Back) to return to the previous window.
Step 6: Review and Confirm (Riepilogo)
The final window is called “Riepilogo” (Summary). Here the system displays all the details you have entered. Take a moment to carefully review everything. If you see an error, you can return to the previous windows and correct it. If all the details are correct, Confirm them. This will finalize the activation process. You’ll then receive a confirmation by email or SMS, proving that your ticket has been successfully activated and linked to your vehicle for the chosen day.
With your ticket now activated, you can drive into Area C without worrying about fines for that day.